If your HVAC system isn’t performing as expected, some rooms feel stuffy while others stay cold; it could be due to hidden duct repair problems. These issues quietly reduce comfort, waste energy, and allow contaminants to enter your air. Leaky ducts, poor insulation, and airflow loss are more than minor annoyances; they strain your system and raise bills.
Understanding how to identify and fix these problems helps restore comfort and saves money. In this article, we will explore the most common duct repair problems, essential tools, DIY solutions, and when it is time to call an HVAC professional.
Let us start with what typically goes wrong inside your duct system.
What Are the Most Common Duct Repair Problems?
Before you fix duct repair problems, it is important to recognize the cause behind symptoms like uneven heating, odd smells, or reduced airflow. These signals usually point to leaks, contamination, crushed ducts, or missing insulation.
Let us explore each issue, how it affects your HVAC system, and the best way to fix it.
1. Leaky or Disconnected Ducts
One of the most common duct repair problems is leakage at joints or loose sections. These allow heated or cooled air to escape, lowering HVAC efficiency and increasing energy bills.
Technicians detect leaks with smoke pencils and seal them using mastic sealant or UL 181 foil tape, not standard duct tape. Proper sealing restores system balance and indoor comfort. If left unresolved, leaky ducts contribute to air loss, reduced airflow, and greater system wear.
2. Poor Insulation or Heat Loss
If ducts pass through unconditioned spaces, poor insulation leads to major energy loss. This forces your HVAC system to work harder to maintain desired temperatures. Adding fiberglass insulation or foil wrap with a high R-value improves thermal performance.
Wrap exposed areas with R-8 insulation to prevent unwanted heat exchange. Insulating ducts boosts efficiency by up to 30%, especially in older homes. Learn more about maintaining your system’s performance with Benefits of Air Duct Cleaning for Home.
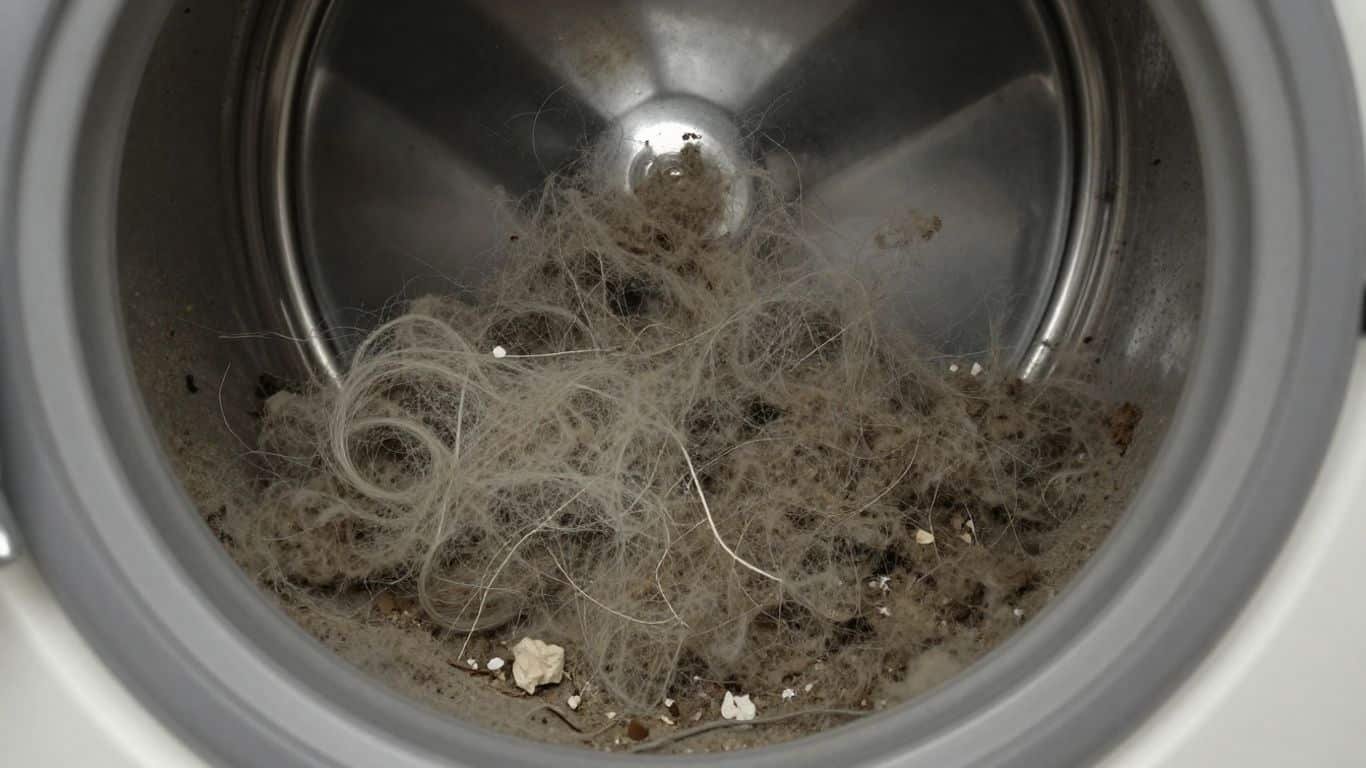
3. Dirty or Contaminated Ducts
Dust, mold, and pet dander inside your duct system can degrade indoor air quality and block airflow. Technicians detect leaks with smoke pencils and seal them using mastic sealant or UL 181 foil tape, not standard duct tape. Proper sealing restores system balance and indoor comfort. If left unresolved, leaky ducts contribute to air loss, reduced airflow, and greater system wear. Always inspect for gaps in your duct system or schedule air duct cleaning services in Plano to detect issues early.
4. Crushed or Kinked Flexible Ducts
Flexible ducts can easily be crushed by storage boxes or improper installation. This creates airflow blockage, reducing comfort and efficiency. Examine attics or crawl spaces for visible sags, sharp bends, or collapsed sections.
Gently straighten or replace the damaged sections to restore balance. Minor issues can be DIY-friendly, but severe damage may require a professional. Damaged ducts restrict airflow and lower system performance, which can raise energy bills and shorten the life of your HVAC system.
Tools and Materials Needed for DIY Duct Repair
You don’t need a huge toolset to fix most duct repair problems. With the right materials, you can seal leaks, insulate exposed areas, and clean dirty ducts. Below is a breakdown of basic tools, safety gear, and detection equipment every DIYer needs to maintain their duct system effectively.
1. Basic Tools and Sealants
Essential items include mastic sealant, UL 181 foil tape, zip ties, and duct clamps. A duct knife and cleaning brush may also be needed. For better results, shop for NADCA-certified or Home Depot-recommended materials. These tools help fix leaks and secure ductwork for improved airflow and system performance.
2. Safety Equipment and Detection Tools
Wear gloves, a dust mask, and use a camera scope or smoke pencil to detect leaks and check tight spots. An airflow tester helps measure duct performance after repair. Technicians locate duct leaks using a smoke test, but with the right tools, you can do it too.
How to Fix Common Duct Repair Problems? – Step-by-Step
Now that you know what is wrong and have the tools, let us go over how to fix duct repair problems the right way. Follow these steps for sealing, insulating, cleaning, or replacing damaged ducts. These DIY-friendly solutions are cost-effective, safe, and help improve your HVAC system’s performance long-term.
1. Sealing Air Leaks
Start by locating leaks with a smoke pencil or hand test. Clean the duct surface, then apply mastic sealant or UL 181 foil tape over seams; never use standard duct tape. This seals joints in both metal ducts and flexible ducts. Sealant covers leaking seams and restores airtightness, preventing air loss and boosting overall HVAC performance.
2. Re-Insulating Exposed Ducts
Remove damaged insulation and wrap the duct with R-8 fiberglass insulation or foil-backed wrap. Use foil tape or zip ties to secure it and add a vapor barrier to resist moisture.
Insulation protects ducts from heat transfer and reduces energy loss, especially in attics or crawl spaces. This easy fix significantly improves your HVAC system’s performance.
3. Cleaning Contaminated Ducts
Disconnect the register and insert a HEPA vacuum or rotary brush to remove dirt, dust, and mold. For deeper cleaning, use NADCA-approved duct sanitizers and cleaning tools. Always wear gloves and a dust mask. Routine cleaning boosts airflow, protects your HVAC system, and improves indoor air quality, especially in homes with allergies or pets.
4. Straightening or Replacing Damaged Flex Ducts
Crushed or kinked flexible ducts block air movement. Disconnect the damaged section and inspect it. If it’s minor, gently straighten the bend. If it is crushed, replace it with a new flex duct and secure it using duct clamps. Flexible duct repair prevents airflow blockage and keeps your HVAC system balanced and efficient.
You can also check air duct cleaning in Wilmer if you’re in nearby Texas areas for local expert help.
Overview of Duct Repair Problems and Their Fixes
Here is a quick reference chart covering the most common duct repair problems, their causes, and how to fix them. Use it to decide if a repair is DIY-friendly or best left to a professional.
| Problem | Cause | Fix Method | DIY‑Friendly | Cost Estimate |
| Leaky duct joints | Poor sealing or old tape | Mastic or foil tape | Yes | $10–$50 |
| Poor insulation | No wrap or aging material | Wrap with R-8 | Yes | $30–$100 |
| Mold/dust buildup | Filtration issues | HEPA vacuum & brush | Maybe | $50–$300 |
| Kinked flexible ducts | Weight or bad installation | Replace or straighten | Yes | $20–$150 |
When to Call a Professional for Duct Repair?
Some duct repair problems go beyond what a typical DIYer can handle. If you are dealing with major mold contamination, need to reroute entire ducts, or suspect serious airflow or pressure problems, it is time to call an HVAC specialist. These professionals use airflow testing, static pressure measurements, and specialized tools to identify and solve complex issues. HVAC pros diagnose airflow problems and recommend repairs that ensure your system runs safely, efficiently, and reliably for years to come.
DIY vs. Professional Duct Repair – A Quick Comparison
The table below shows exactly when you can DIY duct repair and when you must call a professional for the best service.
| Task | DIY Safe? | Tools Required | When to Call Pro |
| Sealing small leaks | Yes | Mastic, foil tape | If multiple leaks |
| Re-insulating ducts | Yes | Insulation, gloves | If water-damaged |
| Removing mold | No | HEPA tools, PPE | Always |
| Fixing airflow loss | No | Pressure tester | Always |
FAQs About Duct Repair Problems
How do I know if I have a duct repair problem?
Uneven airflow, odors, whistling sounds, or higher energy bills are warning signs. You can learn more in Improve Indoor Air Quality with Regular Air Duct Inspections for early detection tips.
Is duct sealing worth it?
Absolutely. Sealing leaky ducts improves system performance, prevents energy loss, and boosts indoor comfort. In older homes, it can reduce energy waste by up to 30%. Proper sealing also extends the life of your HVAC system.
Can I use duct tape for duct repair?
No. Standard duct tape degrades quickly under temperature changes. Use UL 181 foil tape or mastic sealant, which are approved for HVAC systems and offer a long-lasting, airtight solution for sealing ductwork joints and seams.
How much does duct repair cost?
Basic repairs range from $150 to $300, while extensive ductwork can exceed $1,000. Refer to How Much Does Air Duct Cleaning Cost for regional cost insights.
What are flexible duct problems?
Flexible ducts can kink, sag, or collapse due to poor support or weight from stored items. These issues block airflow, reduce efficiency, and cause uneven heating or cooling. Proper routing, suspension, or replacement restores optimal HVAC performance.